
Documentation
Unified Access
- Home
-

- Documentation
-
- Unified Access Docs
Below you’ll find more in-depth explanations of all the features of the Unified Access plugin. If there is still something that has you stumped, never hesitate to also reach out to our Unified Helpdesk.
Install the Plugin
Log in to your members area and download the “Unified Captures” plugin. Then log in to your WordPress Admin and find your way to the plugins page.

At the top, you’ll see an “Add New” Button. Click that.

At the top, you’ll see an “Upload Plugin” button. Click that and it’ll open the “Choose File” section.
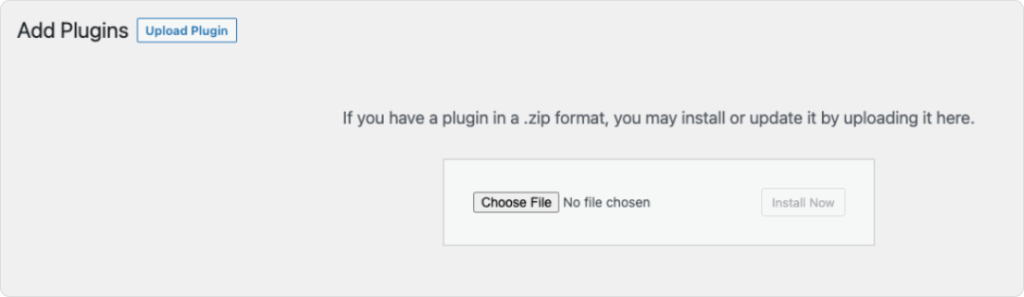
Choose the file you downloaded to your desktop and follow the installation process.
Access Control
For more detailed information on managing post types in WordPress, visit the WordPress Codex.
Protect Content by Post Type:
This feature allows you to safeguard your content by setting up a password or assigning specific user roles for access. Selecting a ‘Post Type’ lets you apply these restrictions across all content within that category. For instance, if you choose the ‘Post’ type, you can set a password that visitors must enter to view any post, or designate certain roles, such as ‘Subscriber’ or ‘Editor,’ to have exclusive access. This ensures that sensitive or premium content remains secure and accessible only to the intended audience.

Protect Content by Taxonomy:
Enhance the security of your website by controlling access to content based on its taxonomy—categories, tags, or custom taxonomies. By setting a password, you can restrict access to all items within a selected taxonomy, ensuring that only visitors with the password can view this content. Alternatively, you can assign specific user roles, like ‘Member’ or ‘VIP,’ to grant exclusive access to certain taxonomies. This feature is ideal for segmenting content access according to the audience, like members-only categories or topic-specific tags.
For additional information on WordPress taxonomies, visit the WordPress Codex.

Popup Cookie Settings:
Customize the frequency of your site’s popup displays with our cookie expiration settings. You can select the time frame after which a popup reappears to the same user, ranging from ‘1 Day’ to ’30 Days’, or opt for ‘Per Session’ for it to appear every time the user starts a new session on your browser. A session is defined as the period of active interaction between the user and the website, which resets when the browser is closed. Adjusting these settings helps balance user engagement with non-intrusive browsing.
For a deeper understanding of how web sessions and cookies work, check out the MDN Web Docs on HTTP Cookies.

Styles & Messaging
Change Styles and Content with Ease:
Take control of the popup and access messaging, look and feel with these sections.

WooCommerce Account Tab
Overview:
The WooCommerce Tabs feature allows you to add customized tabs to the My Account page in WooCommerce. These tabs can display custom content, link to other pages (protected or public), or redirect users to off-site resources.
How It Works:
Add a Tab

Navigate to the WooCommerce Account Tab in Unified Access settings.
Enter the Tab Name (e.g., “Bonus Content”).
Choose what the tab should do:
- Add Tab Content: Enter custom content that will display inside the tab.
- Use a Custom Link: Redirect to an external page or a different section of your site.
- Select a Page: Link to a WordPress page, post, or post type protected by Unified Access.
Choose a Role
Assign the tab to a specific role. For most use cases, select the WooCommerce “Customer” role.
Save Changes
After saving, the tab appears in the My Account navigation for users with the selected role.
Example Use Cases
- Exclusive Content Access: Add a tab with downloadable resources for customers.
- Dashboard: Create a dashboard tab for quick access to member features.
- Protected Landing Pages: Redirect to protected pages with role-based access.

Payment Gateways
Available Today: Paypal
Overview:
Unified Access now supports integrating PayPal payments (with plans to someday expand to include other payment gateways like Stripe). This feature allows you to process payments while leveraging Unified Access’s role-based content protection.
How It Works:
Configure Payment Gateways:
Navigate to the Payment Gateways tab in Unified Access settings.
Select the Payment Gateway (e.g., PayPal).
Toggle Sandbox Mode for testing or Live Mode for production.
Enter the required credentials:
- PayPal Client ID
- PayPal Secret Key
Set Product Details:
Add the Product Name and Amount.
Test the Setup:
Use the sandbox environment to test the checkout flow.
Once confirmed, switch to Live Mode.

User Role & Extending Access
Your customers are added to a unique role called Unified Customer
Unleash the power of this feature and give ANYTHING on your site this role via the flexible Access Controls. Choose Post-types, categories or tags. And now just link to these pages or areas on your dashboard!